![]() Introductory text for this page…. Lorem ipsum dolor sit amet, consectetur adipiscing elit, sed do eiusmod tempor incididunt ut labore et dolore magna aliqua. Ut enim ad minim veniam, quis nostrud exercitation ullamco laboris nisi ut aliquip ex ea commodo consequat. Duis aute irure dolor in reprehenderit in voluptate velit esse cillum dolore eu fugiat nulla pariatur. Excepteur sint occaecat.
Introductory text for this page…. Lorem ipsum dolor sit amet, consectetur adipiscing elit, sed do eiusmod tempor incididunt ut labore et dolore magna aliqua. Ut enim ad minim veniam, quis nostrud exercitation ullamco laboris nisi ut aliquip ex ea commodo consequat. Duis aute irure dolor in reprehenderit in voluptate velit esse cillum dolore eu fugiat nulla pariatur. Excepteur sint occaecat.
Making your Brightspace Course Active
As you begin teaching in Brightspace, you may notice that your course is labeled ‘inactive’ and that your students cannot access the course.
To make your course active:
- Go to https://brightspace.cuny.edu
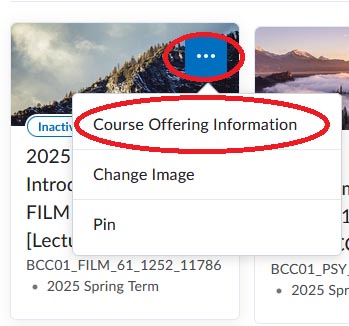
- On the Bronx CC Brightspace homepage, go to the course you wish to make active from the My Courses Widget. Hover on the course and an icon of three dots appear. Click on it and select Course Offering Information from the Dropdown menu.
- Once you are on the course offering information page, scroll down to the section named “Active.” Check the box to the left of the term “Course is active”.

Scroll to the bottom of the page and select “Save”.
Setting Notifications
You can set notifications in Brightspace to alert you about submissions of assignments, discussion posts, content created or updated, and release of grades.
- To set up notifications, click on your name in the upper-right hand corner and select Notifications

- Select notifications for a variety of components in the Instant Notifications screen and click Save.

- Note: Students are also able to set notifications. If you would like students to be notified when you have posted an announcement, let them know they can set it up in instant notification for Announcements-new announcement available
Setting up Your User Profile
- To edit your user profile click on the drop-down arrow and then select Configure This Widget

- Add a heading, your name, and some information about yourself.
- You can also upload a photograph by clicking on the icon of the cloud with an arrow; you will then be asked to select a photo from your computer.
- You can also add your Facebook and X(Twitter) account information
- Once you have completed all your changes click Save.
