![]() Introductory text for this page…. Lorem ipsum dolor sit amet, consectetur adipiscing elit, sed do eiusmod tempor incididunt ut labore et dolore magna aliqua. Ut enim ad minim veniam, quis nostrud exercitation ullamco laboris nisi ut aliquip ex ea commodo consequat. Duis aute irure dolor in reprehenderit in voluptate velit esse cillum dolore eu fugiat nulla pariatur. Excepteur sint occaecat.
Introductory text for this page…. Lorem ipsum dolor sit amet, consectetur adipiscing elit, sed do eiusmod tempor incididunt ut labore et dolore magna aliqua. Ut enim ad minim veniam, quis nostrud exercitation ullamco laboris nisi ut aliquip ex ea commodo consequat. Duis aute irure dolor in reprehenderit in voluptate velit esse cillum dolore eu fugiat nulla pariatur. Excepteur sint occaecat.
Using the Built-In Turnitin Tool for Assignments
Brightspace includes a built-in Turnitin tool that will help you scan a student’s assignment for plagiarism. We recommend you use the Turnitin tool available through Assignments since it connects seamlessly with other Brightspace features, including the gradebook.
Adding an Assignment
- In your Brightspace course navbar, click on Assignments
![]()
- On the next page, click on New Assignment

- Add a title and make sure that your assignment is set to be graded
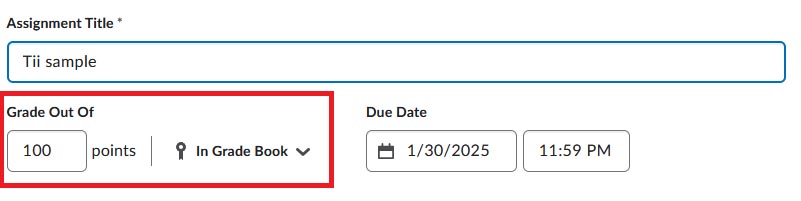
- Open the Evaluation and Feedback block, scroll to the bottom, and click on the button labeled Manage Turnitin

- Make sure that the checkboxes to enable both similarity report and online grading are checked

- If desired, at the bottom, click on More Options to access additional settings. Note that these settings will be retained across Assignments

- After you are done choosing your settings, click on the Save button

View a Similarity Report
Similarity Reports allow you to monitor students’ submissions and identify any signs of plagiarism. Submissions are automatically compared to an online database of original content.
- To view a Similarity Report, from the Users tab of Assignments, click on the bar graph

- The student’s work opens in Turnitin with similar content highlighted and referenced

- To provide overall feedback and add a grade, click the Go to Evaluation link
- To provide in-line feedback, click on the edit icon to open Feedback Studio in Turnitin

Using Class Progress
The class progress tool provides you with information about the work students have completed in your course. It also provides some information about student grades
To Access Class Progress
Select Class Progress tool on your Course Navigation bar. You can also find it under Course Admin

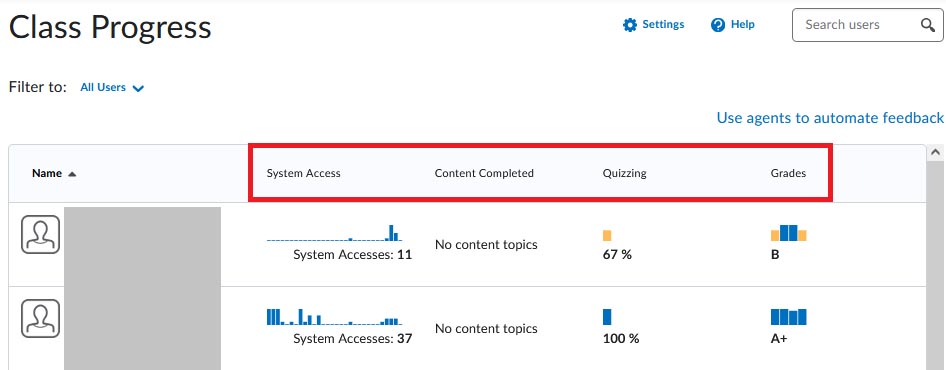
Class Progress displays a table of four indicators:
- System Access indicates the number of times a student has accessed all their courses, using a browser, or the Pulse app
- Content Completed displays the number of course items the student has completed based on the total of items in your table of contents
- Quizzing shows a student’s score for quizzes in a course
- Grades displays a collection of bars showing individual grades
If you click on an individual’s name, you can see a list of all of the items counting towards their own class progress. It is organized in a menu on the left side of the page, and each section contains additional information pertaining to the area

Using Quick Eval
You can use Quick Eval to view all of your students’ submissions that need grading. On the course page, you can view the Quick Eval widget. It provides some basic information about whether there are items that need grading

Access Quick Eval by selecting it on your course Navbar or by locating it in Course Admin

Clicking on a user’s name opens an evaluation screen directly from the Quick Eval list so that you can begin grading. The search function in Quick Eval allows evaluators to locate submissions for evaluation by searching for a specific user, assignment, quiz, discussion topic, or course. Once you have finished grading, you can either publish your feedback, or save it as a draft
Submissions Views
The Submissions view supports anonymous marking for assignments created with the Hide student names during assessment option selected


Activities Views
By default, unassessed activities do not appear in Quick Eval once a course’s end date is reached
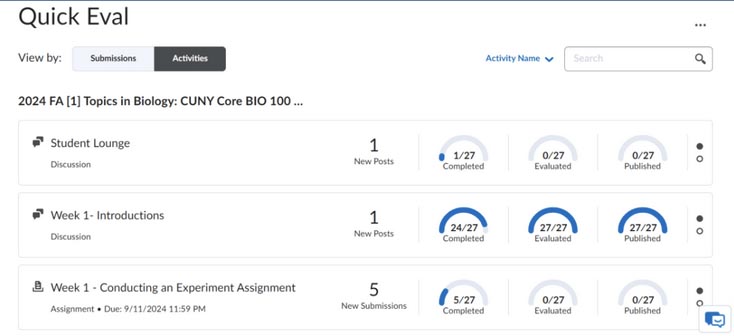
To toggle between the graphical summary view and the evaluation view, click on the radio buttons in the display:


Working with Course Content
Adding a Module
In Brightspace, content is arranged in modules with the Content area. Select the Content link from your course navbar

- To add a module, scroll down to the add a module box

- Type the name of the module and hit return
- The name of the module will appear at the bottom on the table of contents. You will also see the module on the Content Navigator Widget on your course homepage


Adding Content to a Module
- Go to Upload/Create. Select the option upload files. You will then be asked where the files are coming from. In this example, my computer is selected


- You will then be prompted to upload your files-simply drag and drop them. You can add multiple files of different types at once. After the files have uploaded, click the Add button.

- You will see your content added to the module
Note: You can rearrange modules by placing your cursor on the series of dots next to the name of the module. Drag the module to the place on the Table of Contents you would like it to appear. You should see a bar with a blue dot appear. When you see it, drop the module to the location.